Project Workspace Guide
The Project Workspace is MPM's visual canvas for organizing prompts, managing references, and generating AI content. Think of it as your creative command center where every prompt becomes a node you can connect to libraries of reference images and output for Midjourney or access AI generation models directly.
Combined with AI Prompt builder, Workspace is the dream setup for Midjourney power users that also need access to other popular models. One Key Prompt, powerful reference management and 27 AI models - all in one space.
Designed for Desktop.

Workspace Expands Creative Freedom
MPM's Workspace transforms your work with prompts into a visual canvas where you work with multiple prompts and AI generation models. It really shines when combined with AI-powered prompt generation with our style library helping you create the most beautiful images and Xtreme Camera Controls for spectacular videos.
The true power of the Workspace comes to light when you can route reference images quickly and easily from prompt to prompt among 8 reference types. Combine and iterate at will!
Key Features of Workspace:
Project Prompts
Your saved prompts displayed as interactive cards with purple borders. Each prompt node is a visual representation of a prompt you've created.
- • Profile image thumbnail (click to change)
- • Status indicators showing configured modes
- • AI Prompt Builder
- • Key Prompt button to view full prompts
- • Connected reference thumbnails by type
- • Add Refs (reference images)
Key Prompts
MPM is built around Key Prompts being the central source of truth around which everything operates. The Key Prompt is the final string that gets sent to AI models. It combines your base prompt with all parameters, references, and settings into one complete command. Each prompt has two Key Prompts - one for Images and one for Video.
- • Click the Key Prompt button on any prompt card to view the full output
- • Cards indicate whether a prompt has been created (check mark) or is empty
- • Use this to verify accuracy before copying to Midjourney or generating AI Images and Video
- • Two ways to create or update: AI Prompt Builder for guided creation or Pro Editor for fine-tuned control
Image Generation IMG
Generate images directly in the workspace with available models or via Copy & Paste to Midjourney.
AI Generation Cards
In-app image creation with fal.ai models
- • Select model, configure parameters
- • See credit cost before generating
- • Save results to your library
MJ Image Cards
Discord copy-paste workflow for Midjourney
- • Build prompts with style/character/omni refs
- • Adjust MJ parameters (version, aspect, stylize)
- • Copy and paste to Discord
Video Generation VID
Create videos with AI models or copy MJ video prompts. Video cards appear at the top of the models panel.
AI Video Generation Cards
Direct video creation with fal.ai video models
- • Start/end frame support
- • Character reference for supported models
- • Cinematography controls
MJ Video Cards
Build video prompts for Discord workflow
- • Start/end frame references
- • Motion and camera controls
- • Copy for Midjourney Web UI or Discord
27 AI Models including Midjourney
Access all models from the right sidebar. Video models appear at the top, Image models below (scroll down). Click to add to workspace or drag directly onto the canvas.
VID Video Models (15 + MJ Video Platform)
Kling, Grok, Veo, Sora, Luma, MiniMax, Hunyuan, Wan, Mochi, MJ
IMG Image Models (12 + MJ Image Platform)
Nano, Grok, Kling, GPT Image, Recraft, Seedream, FLUX, MJ
- • Toggle category visibility with collapse buttons
- • Click a model card to add it to the workspace
- • Drag model cards directly onto the canvas for precise placement
- • More models will be added as creators show interest
AI Prompt Builder (Key Prompt Ninja)
The AI Prompt Builder is your intelligent assistant for creating prompts. Key Prompt Ninja asks clarifying questions, suggests parameters, and builds professional-quality prompts through conversation.
- • Guided prompt creation with AI suggestions
- • Automatically configures parameters based on your description
- • Reviews reference images you have assigned to the prompt
- • Access from the top of the prompt cards using the color-coded AI Prompt buttons
Key Understanding: Temporary vs Permanent Changes
Parameter changes on model generation cards are temporary for quick testing. To make permanent changes to your prompts, use the AI Prompt Builder for guided editing or the Pro Editor 3.0 for fine-tuned control over references and parameters. In most cases, the AI Builder can handle the job.
How to Access Workspace
There are several ways to open or create a workspace. Important: Workspaces are always associated with a project—each project has one workspace where all its prompts live.
Dashboard — The Easiest Way
From your Dashboard, click the Create Workspace button. This creates a new project and opens its workspace in one step.
AI Prompt Builder → Open in Workspace
Starting a new project? Use the AI Prompt Builder on the homepage to create your initial prompt. After building your prompt, you'll see an "Open in Workspace" option.
This lets you name your prompt, create or select a project, choose a team (defaults to Personal), and jump straight into the visual workspace with your new prompt ready to go.
Editor → Workspace Button
In the Pro Editor, create a new prompt or open an existing one. Click the Workspace button to either:
- • Create a new workspace for the prompt's project
- • Open the existing workspace if the project already has one
The workspace opens to the project associated with your current prompt.
Projects Page
Go to your Projects page to see all your projects in one place. From here you can:
- • Open a workspace for any existing project
- • Create a new workspace — this also creates a new project automatically
Projects & Workspaces
Every workspace belongs to exactly one project, and every project can have one workspace. Think of the workspace as your project's visual canvas—all prompts, references, and generation cards for that project live together in its workspace.
Workspace Layout & Navigation
Navigation Controls
- • Pan: Click and drag on empty canvas space
- • Zoom: Mouse wheel or pinch gesture
- • Reset View: Double-click empty space
Workspace Layout
- • Left Column: Prompts and Layouts
- • Center: Workspace canvas
- • Right Column: Models
- • Top Bar: Important information, links, and collapse toggle (hides prompt details, shows only profile images)
Creating Layouts
Each project can have multiple workspace layouts (think of them as different "views" or "scenes"):
- 1 Click "+ New Layout" in the layout dropdown
- 2 Name your layout (e.g., "Character Designs", "Campaign Concepts", "Video Storyboard")
- 3 Arrange prompts and connections however you want
- 4 Auto-saves as you work
Use Cases for Multiple Layouts: Organize by campaign or client, separate ideation from final production, create themed collections.
Prompt Cards
Prompt cards are the visual representation of your prompts on the workspace canvas. Each card displays key information and provides quick access to editing, references, and generation tools.
Prompt Node Actions
Prompt name
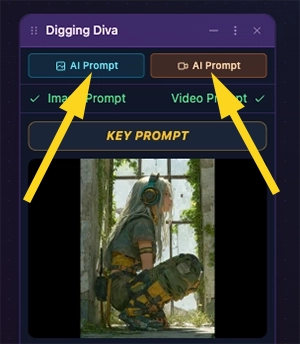
AI Prompt Builder buttons:
- AI Prompt - Generate/edit image prompt using AI
- AI Prompt - Generate/edit video prompt using AI
- Key Prompt - View full prompt text with all parameters and camera controls
- Profile Image - You can set this by hovering over the thumbnail
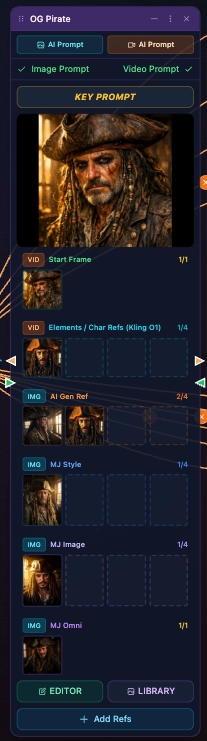
Middle Section - References
- Color-coded reference thumbnails with counts
- Click X to remove individual references
- Connectors ▶▶ used to connect other prompts (input) and AI model cards (output)
Bottom Section - Quick Actions
- EDITOR (Green glass morphism) - Open full prompt editor
- LIBRARY (Purple outline) - Jump to image library
- Add Refs (Blue solid) - Quick reference upload/selection
Prompt Card Menu (Three Dots)
Each prompt card has a three-dot menu (⋮) in the header, located between the collapse and close buttons. Click it to access prompt management options:
Edit Name
Rename your prompt directly in the workspace. Changes are saved to the database immediately.
Clone Prompt
Create a copy of the prompt with all its content, parameters, and references. Library images are not cloned.
Delete Prompt
Permanently delete the prompt from your database. This action cannot be undone.
Important
When cloning prompts, Key Prompts, parameters, styles and reference (URLs) transfer over, but NOT the image library. This is by design.
Connecting Prompt Cards
The workspace uses visual connections to link prompts with generation cards. This is how prompts share their library images with other prompts to share reference images.
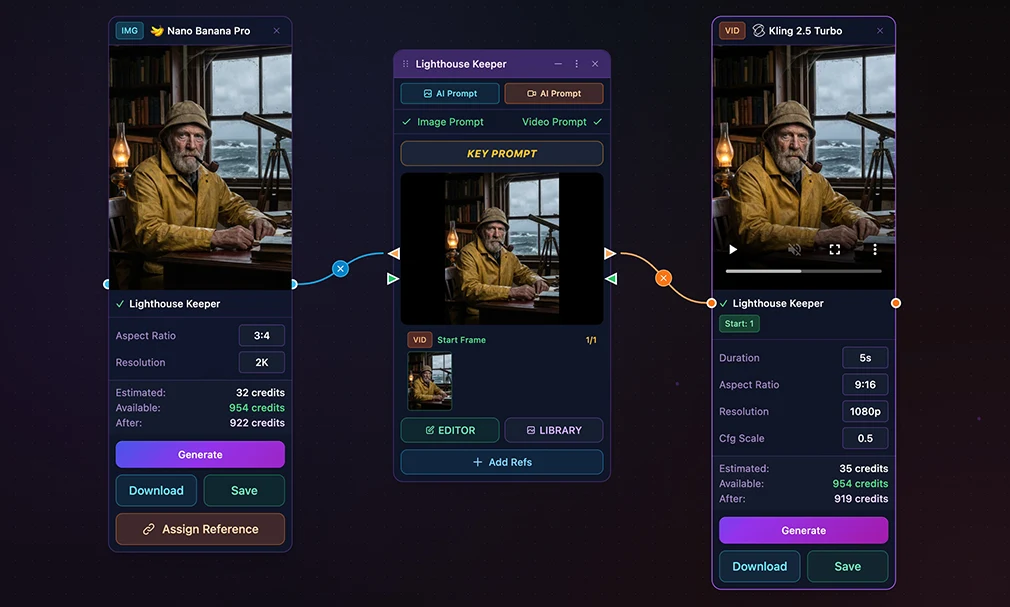
To connect: Click on the orange output handle (small triangle) on a prompt card and drag it to the green input handle (small triangle) on another prompt card, then release.

A prompt node connected to a Nano Banana Pro IMG card — the simplest form of connection
How Connections Work
Creating a Connection
- 1 Click and hold on a prompt node's connection handle (the small circle on the edge)
- 2 Drag to a generator card's input handle
- 3 Release to create the connection
What Happens When Connected
- • Prompt libraries become accessible to both prompt cards
- • Use the Add Ref button to see libraries from attached cards
- • For more details, see the Reference Management System section below
Connection Types
Output Handle ▶
The orange triangle on the right side of a prompt card. Click and drag from here to share your prompt's library with another card.
◀ Input Handle
The green triangle on the left side of a prompt card. Drop connections here to receive library access from the source prompt.
Quick Tips
- • Delete a connection: Simply click the "-" button on any connection line
- • Work with multiple prompts: Share libraries of images by connecting prompt cards together using input and output nodes
- • Connections auto-save: Your workspace layout and connections are saved automatically
The Two Generation Workflows
The workspace supports two distinct workflows for working with MPM prompts:
Workflow 1: In-App Generation (AI Gen Cards)
When to use: You want to generate images or videos directly in MPM using fal.ai models.
How it works:
- • Generator Node (Purple border with VID or IMG badge)
- • Choose from 12 image models or 15 video models
- • Configure model-specific parameters
- • See estimated credit cost before generating
- • Click "Generate" to create content
- • Download results or save directly to your prompt library
Workflow 2: Copy & Paste (Midjourney Cards)
When to use: You want to copy a Midjourney prompt to Discord with reference images and custom parameters.
How it works:
- • MJ Image Node (Blue border) - Build image prompts with style, character, and omni references
- • MJ Video Node (Orange border) - Build video prompts with start/end frames and motion controls
- • Select references visually
- • Adjust parameters (version, aspect ratio, stylization, chaos, etc.)
- • Click "Copy Image Prompt" or "Copy Video Prompt"
- • Paste in Midjourney's Web UI or Discord input
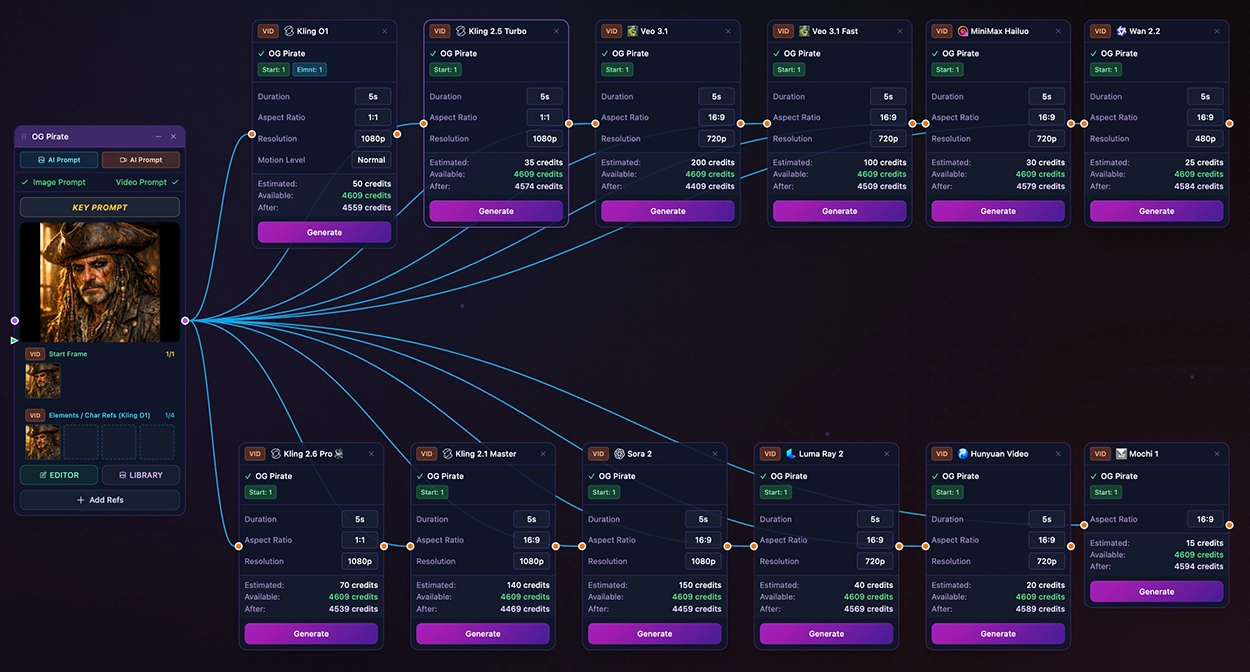
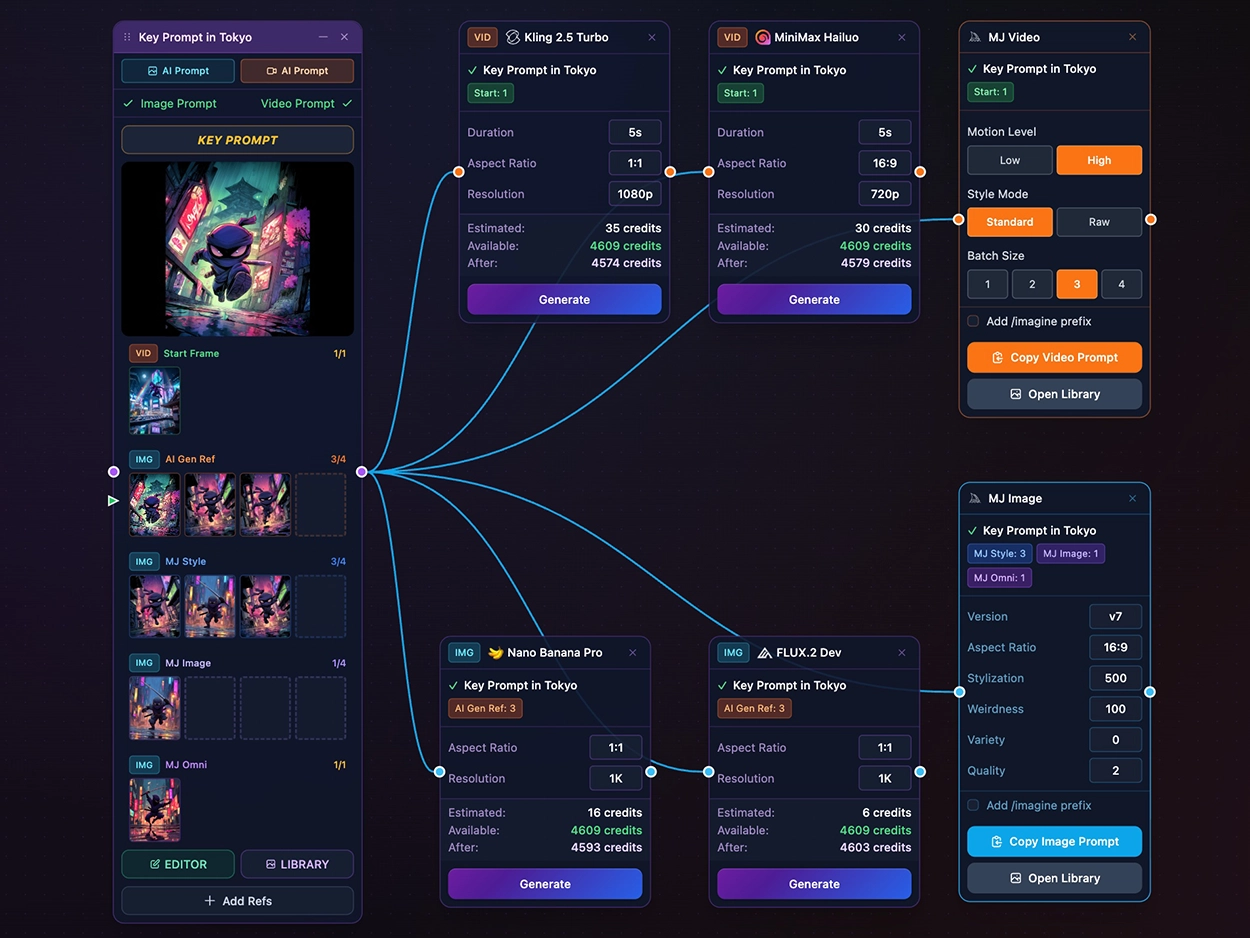
Connecting AI Model Generation Cards
The workspace uses visual connections to link prompts with AI generation cards. This is how your prompts flow into AI models for generation.
To use: Drag a model card from the right sidebar. Midjourney cards are up top, then video gen models, then image models or click the + on the card. Click on the orange output handle (small triangle) on a prompt card and drag it to the orange (video) or blue (image) handle (small circle) on a generation card, then release.
How AI Generation Connections Work
What Happens When Connected
- • The generator card receives the prompt's text
- • Reference images assigned to the prompt are passed along
- • Click Generate on the card to create images/videos
- • Results appear in the card and can be saved to your library or downloaded
Adjusting Input Parameters
- • Aspect Ratio - Choose dimensions for your output
- • Duration - Set video length (video models only)
- • Resolution - Select output quality (720p, 1080p, etc.)
- • Number of Images - Generate multiple variations at once
Critical Detail
Parameter changes on MJ cards and AI Generator cards are temporary overrides for testing - they are NOT saved to your database. If you want permanent parameter changes, use the AI Prompt Builder or Editor.
IMG Image Models
- Nano Banana Pro
- Nano Banana 2
- Grok Imagine
- Kling Image 3.0
- GPT Image 1.5
- Recraft V3
- Seedream 5.0 Lite
- FLUX.2 Pro
- FLUX.2 Flex
- FLUX.2 Dev
- FLUX Schnell
- FLUX.2 Max
VID Video Models
- Kling 3.0
- Kling 2.6
- Kling O1
- Kling 2.5 Turbo
- Kling 2.1 Master
- Grok Imagine
- Veo 3.1
- Veo 3.1 Fast
- Hailuo 02
- Hailuo 2.3 Fast (I2V)
- Hunyuan Video
- Sora 2
- Luma Ray 2
- Mochi 1
- Wan 2.6
Credit System
AI generations use credits, which are clearly marked on each generator card. Changing some parameters may adjust the credits needed for each generation. There is also a batch generation feature at the base of the workspace that enables up to five generations at a time (and batches more for you).
Estimated
16 credits
Reserved when you start
Available
480 credits
Your current balance
After
464 credits
After generation
Automatic refund if fewer images/seconds are generated than requested. Failed generations are fully refunded.
Reference Management System
The workspace uses a color-coded system for managing different types of references:
Reference Type Color Guide
| Reference Type | Color | Badge | Max | Description |
|---|---|---|---|---|
| MJ Style Reference (--sref) | Blue | IMG | 4 | Visual style & aesthetics for Midjourney |
| MJ Character Ref (--cref) | Purple | IMG | 4 | Character appearance (v6 only) |
| MJ Omni Ref (--oref) | Purple | IMG | 1 | Combined style + content (v7 only) |
| MJ Image Prompt | Violet | IMG | 4 | Image prompt with weight parameter |
| AI Gen Reference | Orange | IMG | 4 | Reference images for AI image generation |
| Video Start Frame | Green | VID | 1 | First frame for video generation |
| Video End Frame | Red | VID | 1 | Last frame for video generation |
| Video Character Ref (Kling O1) | Cyan | VID | 5 | Character references for the Kling O1 video model |
You will see these colors associated with reference images in the Prompt Cards, Prompt Image and Video Library, and in badges indicating the number of refs passed to AI Generation Cards to indicate those affecting the prompt sent to the model.
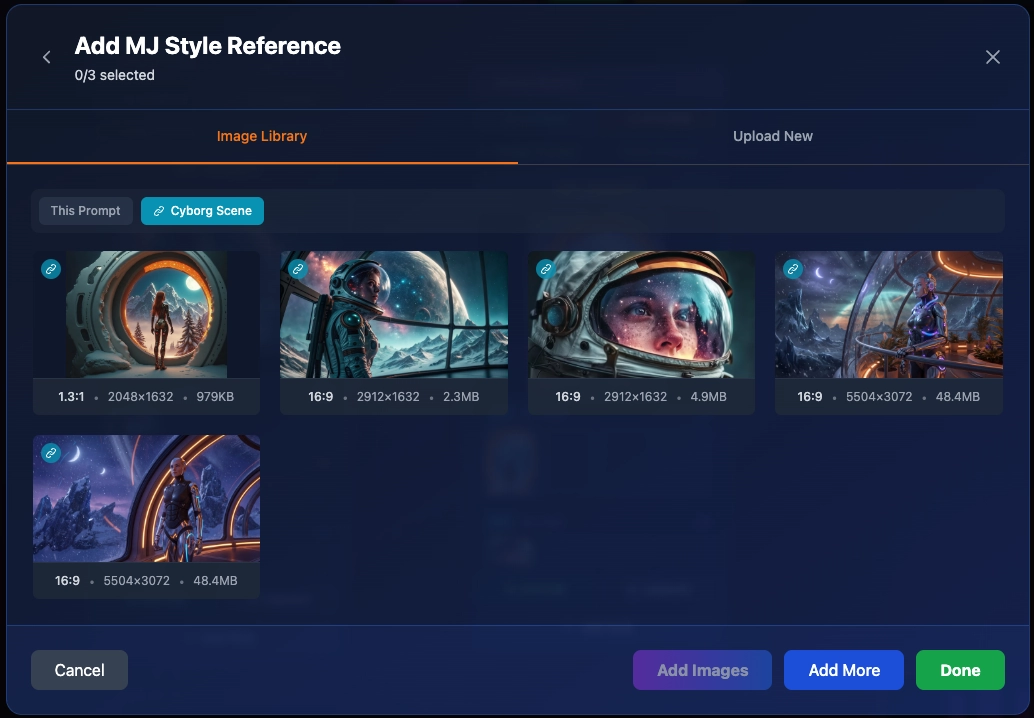
Method 1: Use Add Refs Button
Use the + Add Refs button at the bottom of any prompt card:
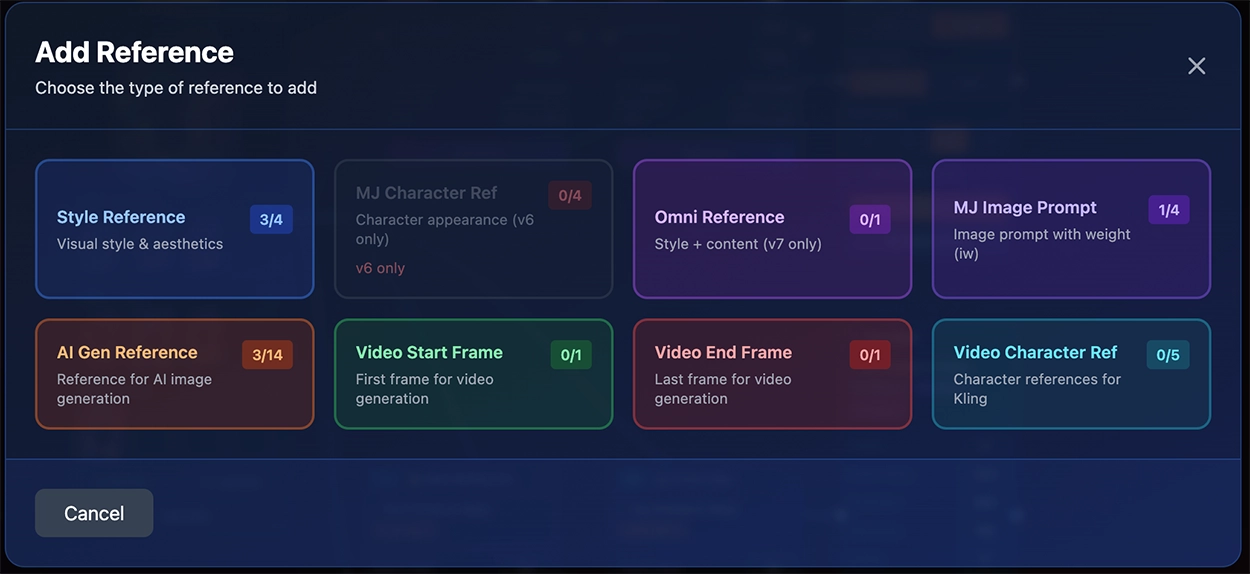
- 1 Click + Add Refs on any prompt node
- 2 Select the reference type you want to add (Style, Character, Omni, etc.)
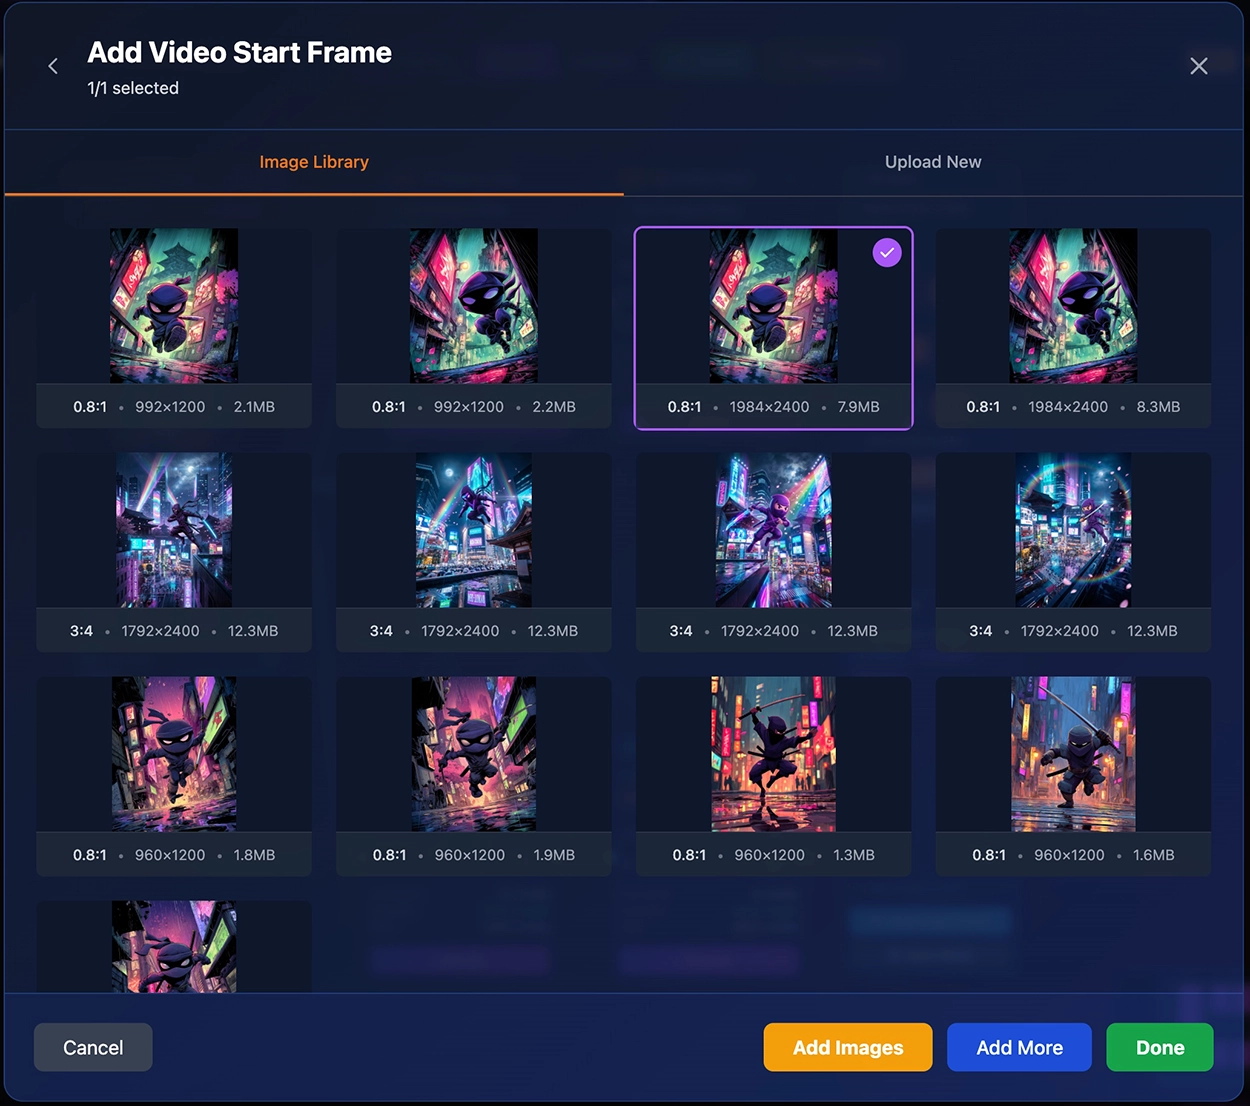
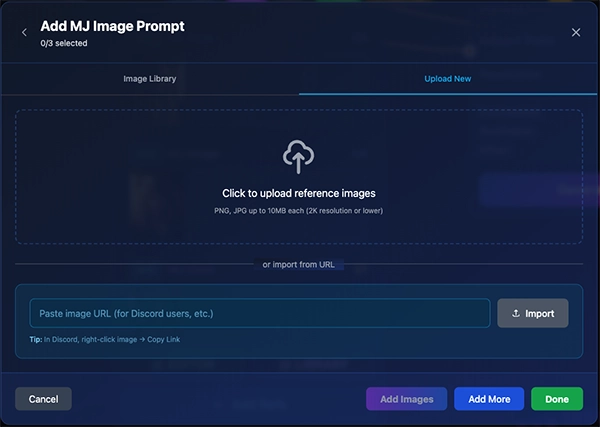
- 3 Choose images from your Library or Upload new images
- 4 Click "Add Images" to confirm
Method 2: Transfer Prompt References
Connect two prompts to transfer references between them:
- 1 Drag a connection from a source prompt to a target prompt
- 2 A dialog appears showing all available reference types
- 3 Select images from the source prompt's library to transfer
- 4 Click "Add Images" to assign them to the target prompt
Accessing Connected Prompt Card Libraries
When prompt cards are connected in the workspace, you can access each other's image libraries directly from the Add Refs dialog. Connected prompts appear as tabbed badges showing the prompt name with a link icon, allowing you to browse and select images from any connected prompt's library.
- • Click Add Refs on any prompt card to open the reference dialog
- • Look for badge tabs showing connected prompt names with a 🔗 link icon
- • Click on a badge to switch between your library and connected prompt libraries
- • Select images from any connected library to use as references in your prompt
Removing References
To remove a reference, click the X on any reference thumbnail inside the prompt card. The reference will be removed immediately and the connection line will disappear.
Managing References
Viewing:
- • References display as color-coded thumbnail boxes below the prompt profile image
- • Number indicator shows count (e.g., "3/4" for 3 of 4 max)
- • VID or IMG badge identifies the category
Removing:
- • Click the X button on any reference thumbnail
- • This updates the database immediately
Generation Card Details
MJ Image Card (Copy & Paste)
Configuration Options:
- • Version: v7 (recommended), v6.1, v6, niji-6
- • Aspect Ratio: 1:1, 16:9, 9:16, 4:3, 3:4, 2:3, 3:2
- • Stylization: 0-1000 (increments of 50)
- • Weirdness: 0-3000 (increments of 100)
- • Variety: 0-100 (chaos parameter)
- • Quality: 0.5, 1, 2
- • Mode: Standard or Raw
- • Add /imagine prefix: Toggle (for Discord quick paste)
Reference Display:
Shows counts for connected references:
- • MJ Style: X
- • MJ Image: X
- • MJ Char: X
Workflow: Connect your prompt → References auto-populate → Adjust parameters → Click "Copy Image Prompt" → Paste in Midjourney (Web/Discord)
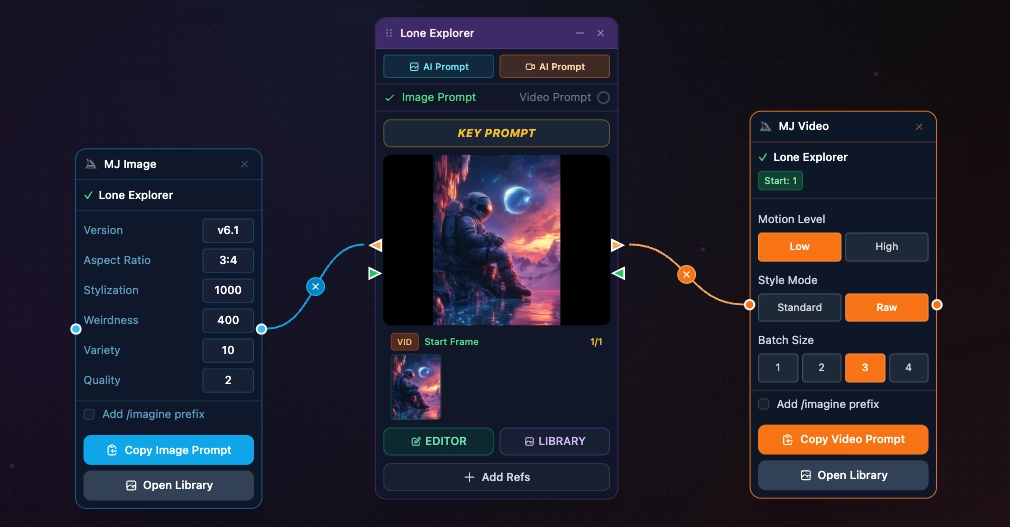
MJ Video Card (Copy & Paste)
Configuration Options:
- • Start Frame: Thumbnail display (1/1 = frame connected)
- • End Frame: Thumbnail display (1/1 = frame connected)
- • Motion Level: Low or High
- • Style Mode: Standard or Raw
- • Batch Size: 1, 2, 3, or 4 (how many variations)
- • Add /imagine prefix: Toggle (for Discord quick paste)
Reference Display:
Shows frames for video generation:
- • Start Frame: X
- • End Frame: X
Workflow: Connect your prompt → References auto-populate → Adjust parameters → Click "Copy Video Prompt" → Paste in Midjourney (Web/Discord)
AI Generator Cards (In-App Generation)
Card Layout:
- • Top: Model icon, name, and badge (VID or IMG)
- • Middle: Parameter controls specific to the chosen model
- • Bottom: Credit estimation and Generate button
Common Parameters:
- • Image Models: Aspect Ratio, Resolution, Number of Images (1-4)
- • Video Models: Aspect Ratio, Duration, Motion controls, Camera movement
Saving Results:
- • Individual Save: Click save icon on each image/video
- • Save All: Bulk save all results to your prompt library
- • Download: Individual download buttons (single generations only)
Critical Behavior: If you navigate away from the workspace or edit the prompt in the Editor, generation cards reset. Complete your generation first, save to the library or download, then navigate elsewhere or update your prompts.
Save Generated Images as References
After generating images on AI Image Generator Cards, you can save the resulting image directly as a reference to the connected prompt. This is great for quickly creating a starting frame for video generation or building up your reference library from AI-generated results.
Understanding What Gets Saved
This is crucial to understand to avoid confusion:
SAVED TO DATABASE
- Reference connections (when you add/remove refs from Prompt Node)
- Profile image changes
- Generated images/videos (when you click "Save to Library")
- Workspace layout positions
NOT SAVED TO DATABASE
- MJ Card parameter changes (temporary overrides for testing)
- AI Generator card parameter changes (only control current generation)
- Generated content (unless you explicitly save it to library)
To Make Permanent Changes:
- • Prompt text/parameters: Use the AI Prompt Builders (image or video) or navigate to the Editor to make fine-grained changes
- • References: Add/remove via Prompt Node (auto-saves)
- • Save Generations: After each generation, it's best practice to save it to the library immediately to prevent asset loss
Tips & Best Practices
Organization/View
- • Create separate layouts for different projects or clients
- • Group related prompts and generation cards visually on the canvas
- • Use the Collapse toggle to hide clutter and work as a mood board
Generation Workflow
- • Test prompts using lower cost AI Generation models first
- • Select generated images to use as references and add them
- • Once your prompt and references are dialed in, generate hi-res images/video
Reference Management
- • It's a good practice to focus on one prompt on the workplace
- • Link other prompts to it to share library images as refs for output
- • Remove unused references to keep things clean. It's easy to add them back!
Credit Conservation
- • Check "Estimated" cost before every generation
- • Start with single images/videos, then batch generate when confident
- • Unused credits from failed generations are automatically refunded
Troubleshooting
My references disappeared when I switched video models.
This is expected behavior. Different video models support different reference types. Your refs are still saved in the database - they'll reappear when you switch back to a compatible model.
I changed parameters on a MJ card but they reverted to defaults.
MJ card parameters are temporary overrides. To make permanent changes, use the EDITOR button and modify the prompt's saved parameters.
Generated content isn't showing up in my library.
You must click "Save to Library" after generation completes. Generated content is NOT automatically saved.
The workspace reset when I opened the Editor.
Navigating away from the workspace resets generation cards. This is by design to prevent stale state. Complete your generations before navigating elsewhere.
I can't add more than 4 style references.
Each reference type has a maximum count (shown in parentheses). This matches Midjourney's limits.
Credit costs seem wrong.
Image costs are per-image. Video costs are per-second. A 10-second video at 1 credit/second = 10 credits total.
Related Features
Ready to Master the Workspace?
Jump into your first project and start organizing prompts visually.